Brute Force Made Easy
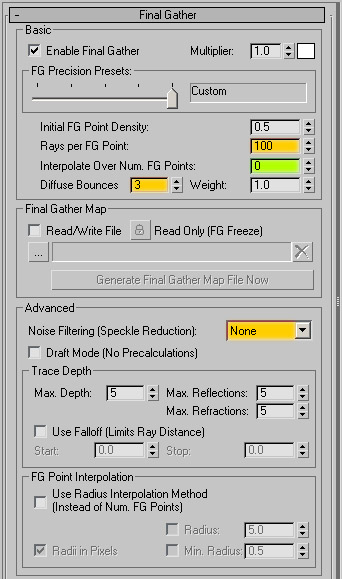
Thought I'd expand a bit upon my previous blog entry where I mentioned the Ctrl.Ghost shader to use importons & irradiance particles. In 3ds Max 2009 (+ Design), we have access to the Force mode of Final Gather right out of the box. To enable this mode you simply set the final gather "Interpolate over num points" setting to 0.
Doing so will enable a "brute force" style FG mode. For this method there's no interpolation or precalculation. Therefore you won't be able to save a .fgm with this method. However, if you're yearning for an easy to configure lighting setup and have a fair amount allocated for the render to 'clear' this is a handy option.

A. Set the Interpolation to 0 (green highlight) to enable the Force mode.
B. Think of the Rays per FG Point setting as your "grain control". Higher values = less grain (longer renders). This isn't the only thing that affects the grain (or render time) though. Your sampling quality affects it as well, more on that later.
C. Diffuse bounces: Same as usual, controls the number of bounces. FWIW, I've kinda grown fond of using low bounces for the contrast that it provides.
D. Noise Filtering (optional): If you set the noise filtering to "none" you're getting close to an 'unbiased' approach because mental ray won't filter out some of light data. However, it may introduce more "speckling" to your image which would require more FG rays.
NOTE: I'm NOT saying this is equal to an unbiased approach because we can still control/limit the diffuse bounces (amongst other things). However, that's not a bad thing though because it can help keep the render times down from those of an unbiased solution. Mind you, any time you hear "brute force" or "unbiased", I think you all know by now that render times aren't going to be blistering fast.
As usual it seems, props to Zap for implementing this nifty little trick in 3ds Max 2009.
Link to Zap's Blog for anyone that may not have it bookmarked already.
NOTES:
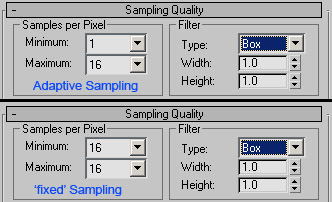
I briefly mentioned how the Rays per FG point setting & sampling quality can affect the amount of grain in your 'brute force' renders. Using an aggressive adaptive sampling rate with a high 'maximum' value will sample more in the grainy areas to help "clear" those areas. So you could possibly use a lower Rays per FG Point setting in that case.
Adaptive sampling vs. 'fixed' sampling:
Fixed sampling rates force mental ray to use a fixed amount of samples for every pixel of the image. Adaptive sampling varies the samples locally (higher where needed, lower where less sampling is required).
----------
Don't have 3ds Max 2009 yet? You can get a similar result to this Force method in previous versions by setting the "Interpolate over num points" to 1 and use a very high "Initial FG Point Density".


