


Projected Caustics
 In this blog tip I'll demonstrate how you can create some decent looking "fake" volume caustics for your water scenes.
In the title I described this as "fake" volume caustics...I did so because this method uses a combination of projected caustic patterns (not acutal caustics), but real volume (parti-volume). So I suppose it's a bit of a hybrid method between realistic & fake.
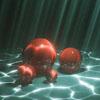
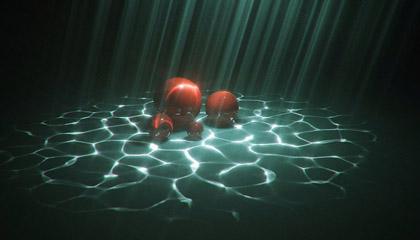
Ok, first up let's take a look at the end result, click the image below to view the animation:
Good news, it's a fairly simple/straight forward setup actually.
1. Download the Caustics Generator program from HERE. I won't go into details on how to use it since it's rather self-explanitory. After spending a few minutes exploring the few settings you should be up to speed on using it.
TIP: I changed the background color from the default blue to black since I only want a black/white image for my projector map.
2. Create a light in your 3ds Max scene and scroll down to the Advanced Effects rollout of the light source. There you'll see where to add your caustic projector files. If you've created an animated sequence of images as I did you'll want to load the entire sequence by letting 3ds Max create an .ifl file and load that. You do this by making sure to enable the "Sequence" option when you load a bitmap into the projector map of the light source.
3. That's it for the "caustics". Now you need some volumetrics. For this I used the parti-volume camera shader. If you need info on what the parti-volume shader is or how to use it, see some of my previous blog entries like THIS.
You could also use the volume effect option on the light, but generally speaking the parti-volume shader will give you more accurate looking results. You also have a bit more control with the parti-volume shader. For example, in this scene I used the height option (mode = 1) to limit where the volume effect happens.
You'll probably also want to restrict the parti-volume shader to your "caustic projector" light source as I did in this scene. If you don't the parti-volume shader will use all the scene lights, even those that do not have an assigned projector map.
4. That's it. Now you can simply tune the effects & lighting in your scene to get the desired result you're seeking.
If you've tried to get volume caustics like this from your water objects without using a projector map, I'm sure you'll find this method much easier & faster to work with. The main drawback is that it's a projected caustic pattern, so it's not based on your actual scene geometry. Therefore it probably will not sync up 100% with your water surface/waves. It may also place the caustic in shadow areas so you'll have to get creative if that's an issue. If your lucky your client won't notice these issues though.
If needed you can download the 3ds Max 2010 scene and caustic projector files I used HERE.
NOTE: I added some color grading and other post work to my animation so don't expect the render output from this file to exactly match my animation above. I've merely shared the raw .max file and associated files to further clarify how I configured the caustic projector light.