


Grass Displacement FAQ
 I frequently receive questions about issues with mental ray displaced grass methods. In this blog entry I will discuss the most commonly asked questions and offer some insight on displaced grass in 3ds Max & mental ray.
Frequently Asked Question #1: “I’m trying to add some nice displaced grass on my terrain/mountain/100 acre front lawn/etc..but I keep getting this out of memory error. What’s wrong with mental ray?”
This is without a doubt the most commonly asked question I receive, but I also see this asked on forums rather frequently. It’s not really a problem with mental ray, rather a limitation of resources. The obvious answer here is that it’s just not practical to try and create millions of displaced grass blades via displacement. Why? The main reason is the sheer amount of resources something like that would take. This is especially true if you’re still using a 32-bit OS, like me.
The not so obvious answer is that vast areas of displaced grass is often not needed. To help explain this, take a look at the following lawn photos:
http://i177.photobucket.com/albums/w207/lkky/MontrealOttawaAug2007041.jpg
http://www.envisionlandscape.net/images/Site_Photos/Z_lawn1.JPG
http://www.gardening.cornell.edu/news/images/lawn.jpg
http://skathy.robinmooney.com/grass.JPG
Notice how you don’t really see all the individual grass blades at medium/far distance from the camera? So doesn’t it make sense to limit the range of the displacement if you’re wanting to use displacement to create grass? How does one limit the range of displacement you ask? Simple, you use a black & white mask to control where displacement occurs.
There are several ways to accomplish this. One of the easiest (IMHO), is to use a falloff map configured to distance blend. It can be based off the viewing direction (default direction). Unfortunately it often doesn’t display properly in the viewport, so it can be tricky to configure the distance settings. I will normally assign the falloff map as a diffuse map during my setup phase. I’ll plug in some contrasting colors and adjust the near/far distance values and spit out some quick test renders to tune the settings. See this example (click to enlarge): 
I prefer to use colors to help visualize this process but you may want to just use the default black & white colors. If you do use actual colors like in my example, make sure you switch them back to black & white before using this map as a mask.
Once you have it configured the way you want, including setting the colors to black & white, you’re then ready to use it as a mask. The results should look like this (click to enlarge):
How do you use it as a mask? There are several ways to do this. You could use it as a mask in a blend material to mix between a displaced material and a non-displaced material. Similarly, you could use it as a mask in a mix map. In the example posted above, I used a cellular map for my displacement. In the first color swatch of the cellular map I assigned my black/white falloff map. The other two color swatches were simply set to black.
Need more info on displacement? A few years ago I created a displacement tutorial here: http://jeffpatton.net/MR_Grass_Displacement.htm
While this tutorial is a bit dated now, a lot of the displacement concepts I discuss there are still valid. Just understand that I used the mental ray/DGS setup because this was written prior to the A&D material. Obviously today you’d want to use the A&D material for this instead.
Frequently Asked Question #2: “I’ve downloaded your displaced grass material (or scene) and it renders fine. However when I apply it to my own mesh it looks completely different, why?”
There are several reasons this could happen. The primary reason is related to your mesh density & displacement settings. When you enable mental ray displacement, mental ray will subdivide your mesh at render time…how much it subdivides is controlled by the Max. Subdiv. setting. Naturally your actual mesh density plays a role here as well. Take a look at this example where I use the same displacement material & settings on a low poly, medium poly, and high poly meshes (click to enlarge):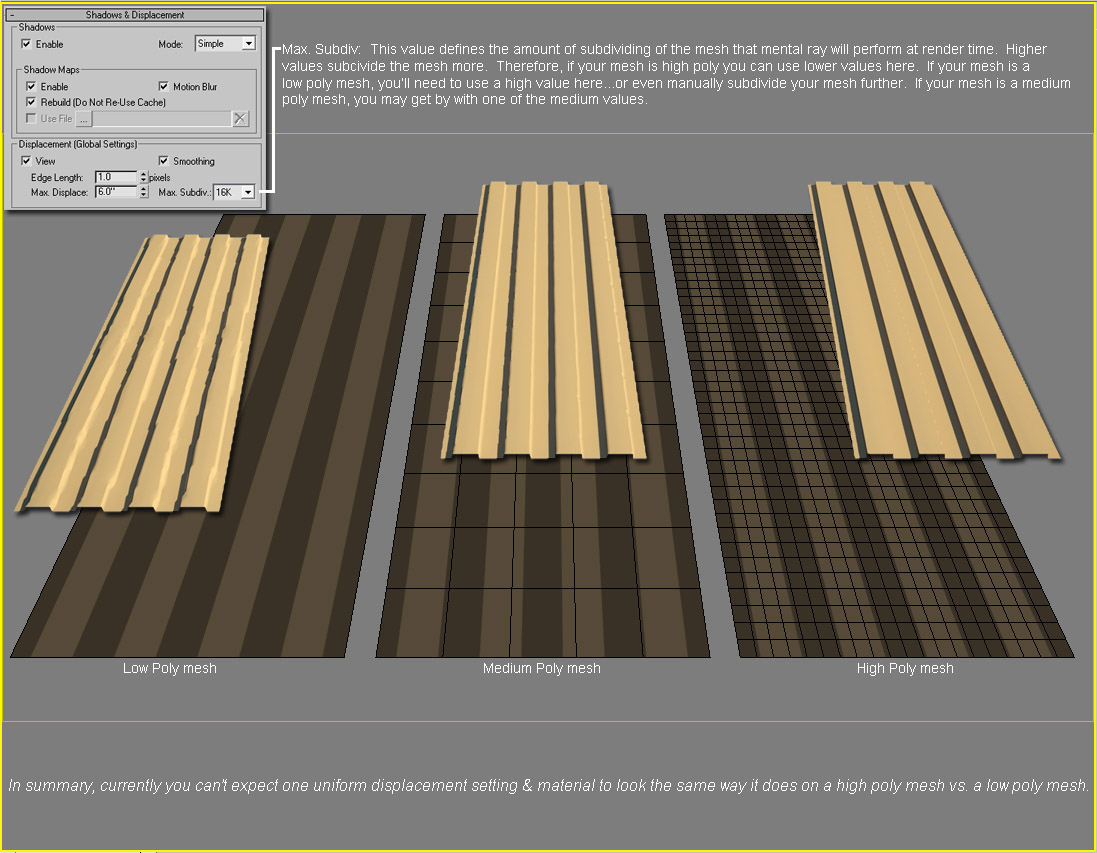
Notice how the displaced low poly mesh has a lot of artifacts (jagged edges), whereas the displaced high poly mesh looks great, and the displaced medium poly mesh falls in between the two in terms of detail. As you can see, mental ray isn’t aware of the density of your mesh. It’s just subdividing each of them based on the Max. Subdiv. Value that I’ve applied.
Therefore it’s up to you to tune this value to suit your mesh. If your mesh is high poly, you can use lower Max. Subdiv. Values. If your mesh is low poly, you’ll need to use higher Max. Subdiv. Values to get better detailed displacement. If your mesh is somewhere in between, you can probably use a medium Max. Subdiv. Value.
Keep in mind that if your mesh is too low poly, even a very high Max. Subdiv. Value won’t provide detailed/accurate displacement. You may need to manually subdivide the mesh in order to get good results.
Frequently Asked Question #3: “I’ve setup a displaced grass scene and the displacement looks great. However when I enable final gather it takes FOREVER to calculate, or even crash during the calculation phase…wtf!?”
Final gather is trying to calculate the indirect illumination in between each and every displaced grass blade. That’s a very intensive process. There are a few workarounds for this situation though. One of the most basic methods is to simply disable the displacement, calculate & save your final gather solution. Then freeze final gather, enable your displacement, and render. You won’t have indirect illumination between all those displaced grass blades, but will your client (or you) even notice…probably not.
I think that covers the top three questions, hopefully that helps explain the problems if you’ve ever ran into any of these issues.
Personally speaking, I don’t particularly like the thought of using displacement for grass. It’s just too rigid, often looking like small spikes…a miniature field of pungy sticks if you will. Hair/fur may provide better results…TIP: maybe try the falloff map I discussed earlier to control that as well since it can also be a resource hog.
Ultimately I’d like to see a dedicated grass solution made available for grass. Something like this looks very promising: http://www.irisa.fr/bunraku/GENS/kboulang/grass.html